
Apache Hadoop is a free and open-source software framework written in Java. It is designed for the distributed storage and processing of big data using the MapReduce programming model. The framework processes massive datasets by splitting them into large blocks and distributing them across multiple computers in a cluster.
Hadoop's modules are engineered to detect and manage failures at the application layer. This approach provides a highly available service on a software level, rather than depending on standard operating system clustering for reliability.
The foundational Hadoop framework is composed of the following modules:
Hadoop Common: This module provides a collection of essential libraries and utilities that support the other Hadoop components.
Hadoop Distributed File System (HDFS): A Java-based distributed file system, HDFS is designed to store data on commodity hardware while delivering exceptionally high-throughput access for applications.
Hadoop YARN: This component is tasked with managing resources on the compute cluster and scheduling user applications.
Hadoop MapReduce: A framework that leverages the MapReduce programming model to facilitate large-scale data processing.
This article will guide you through the installation of Apache Hadoop on Rocky Linux 8. The instructions provided are also applicable to other RHEL 8-based distributions such as CentOS 8 and OpenEuler.
Prerequisites
1. Install OpenJDK 8
For the majority of Hadoop deployments, including later 2.x and all 3.x versions, OpenJDK 8 remains the most thoroughly validated, compatible, and stable option. Oracle JDK is no longer the community standard due to its licensing model, while OpenJDK 11 and newer versions often face compatibility challenges with both Hadoop and its ecosystem components like Spark and Hive. Therefore, this tutorial will utilize OpenJDK 8.
$ sudo dnf install java-1.8.0-openjdk wget -yTo confirm the installation, check the Java version.
$ java -versionThe output should resemble the following:
openjdk version "1.8.0_462"
OpenJDK Runtime Environment (build 1.8.0_462-b08)
OpenJDK 64-Bit Server VM (build 25.462-b08, mixed mode)
2. Create a Hadoop User
For enhanced security, it is strongly recommended to run Apache Hadoop using a non-root user. To this end, we will create a dedicated user named hadoop and assign a password. Execute the following commands with root privileges:
$ sudo useradd -m -d /home/hadoop -s /bin/bash hadoop
$ passwd hadoop # Set a password for the Hadoop user
3. Configure Passwordless SSH Access
Hadoop's daemons require SSH for communication between nodes in a cluster. To enable seamless and automated operations, it is necessary to configure passwordless SSH login.
First, switch to the newly created hadoop user account.
$ su - hadoopNext, execute the following steps as the hadoop user:
# 1. Generate an SSH key pair (public and private).
# When prompted, press Enter to accept the default file path and an empty passphrase.
$ ssh-keygen
# 2. Append the public key to the list of authorized keys on the local machine.
$ cat ~/.ssh/id_rsa.pub >> ~/.ssh/authorized_keys
# 3. Set the correct permissions to secure the authorized_keys file.
# This ensures that only the owner has read and write access.
$ chmod 600 ~/.ssh/authorized_keys4. Verify the Connection
After completing the configuration, verify that passwordless SSH for the hadoop user is functioning correctly.
$ ssh 127.0.0.1If this is the first time you are connecting to this host via SSH, the system will ask for confirmation of the host's authenticity. Type yes to add its public key fingerprint to your list of known hosts (~/.ssh/known_hosts).
You should see output similar to this:
$ ssh 127.0.0.1
The authenticity of host 'localhost (::1)' can't be established.
ECDSA key fingerprint is SHA256:jdKvVL4YEH0GFVKc0lPtsWSrAGckeviAsTtQWPbulaM.
Are you sure you want to continue connecting (yes/no/[fingerprint])? yes
Warning: Permanently added '127.0.0.1' (ECDSA) to the list of known hosts.
Activate the web console with: systemctl enable --now cockpit.socket
Last login: Tue Oct 21 20:05:30 2025
When you are returned to the command prompt after seeing the login message, without being asked for a password, it confirms that passwordless SSH has been configured successfully.
Installing Hadoop
Hadoop Cluster Modes
Hadoop can be deployed in three primary modes, each serving a different purpose.
1. Local (Standalone) Mode
This is Hadoop's default and simplest operational mode.
Characteristics: In this mode, all components run within a single Java Virtual Machine (JVM) process. It utilizes the local file system for input and output instead of HDFS.
Purpose: Standalone mode is primarily used for developing and debugging the business logic of MapReduce programs. Its fast startup and minimal configuration make it ideal for developers to quickly validate their code.
2. Pseudo-Distributed Mode
This mode simulates a multi-node cluster environment on a single machine.
Characteristics: All Hadoop daemons—such as NameNode, DataNode, ResourceManager, and NodeManager—run as separate Java processes on the same machine. This configuration genuinely uses the HDFS file system.
Purpose: It is designed for testing and validating the full functionality of Hadoop, including HDFS operations, the MapReduce execution flow, and configuration settings. The passwordless SSH setup is a prerequisite for this mode and the fully-distributed mode.
3. Fully-Distributed Mode
This is the standard deployment mode for Hadoop in production environments.
Characteristics: Hadoop operates on a genuine cluster composed of multiple physical machines. The cluster includes dedicated Master Nodes (running NameNode and ResourceManager) and multiple Slave Nodes (running DataNode and NodeManager). Data is truly distributed across different slave nodes, and computational tasks are dispatched to these nodes for parallel processing.
Purpose: This mode is intended for processing large-scale datasets in real-world production scenarios. It provides high availability, fault tolerance, and powerful horizontal scalability.
This tutorial will focus on configuring Hadoop in Pseudo-Distributed Mode.
1. Download Hadoop
You can visit the official Apache Hadoop website to download the latest stable release. Alternatively, use the following command in your terminal to download Hadoop v3.4.2:
$ wget https://dlcdn.apache.org/hadoop/common/hadoop-3.4.2/hadoop-3.4.2.tar.gz
$ tar -xzvf hadoop-3.4.2.tar.gz
$ mv hadoop-3.4.2 hadoop
For users in China, the Aliyun open-source mirror provides a faster download experience:
$ wget https://mirrors.aliyun.com/apache/hadoop/common/hadoop-3.4.2/hadoop-3.4.2.tar.gz```
### 2. Set Environment Variables
Set the necessary environment variables in the `~/.bashrc` file. You should modify the `JAVA_HOME` and `HADOOP_HOME` variables to match your system's paths.
```bash
export JAVA_HOME=/usr/lib/jvm/jre-1.8.0-openjdk-1.8.0.462.b08-2.el8.x86_64/
export HADOOP_HOME=/home/hadoop/hadoop
export HADOOP_INSTALL=$HADOOP_HOME
export HADOOP_MAPRED_HOME=$HADOOP_HOME
export HADOOP_COMMON_HOME=$HADOOP_HOME
export HADOOP_HDFS_HOME=$HADOOP_HOME
export HADOOP_YARN_HOME=$HADOOP_HOME
export HADOOP_COMMON_LIB_NATIVE_DIR=$HADOOP_HOME/lib/native
export PATH=$PATH:$HADOOP_HOME/sbin:$HADOOP_HOME/binApply these changes to your current terminal session by sourcing the file.
$ source ~/.bashrc3. Configure Hadoop
Begin by editing the Hadoop environment configuration file.
$ vim $HADOOP_HOME/etc/hadoop/hadoop-env.shAdd the JAVA_HOME environment variable to hadoop-env.sh:
export JAVA_HOME=/usr/lib/jvm/jre-1.8.0-openjdk-1.8.0.462.b08-2.el8.x86_64/Navigate to the Hadoop configuration directory to set up the pseudo-distributed mode.
$ cd $HADOOP_HOME/etc/hadoopEdit core-site.xml to specify properties such as the Hadoop server hostname.
$ vim core-site.xml<configuration>
<property>
<name>fs.defaultFS</name>
<value>hdfs://HXCN-Rokey8-Hpv:9000</value>
</property>
</configuration>The hostname HXCN-Rokey8-Hpv corresponds to your system's hostname. You can find it by running the following command:
$ hostnameNext, create the namenode and datanode directories within the hadoop user's home directory.
$ mkdir -p ~/hadoopdata/hdfs/{namenode,datanode}Edit the hdfs-site.xml file to configure the physical locations for the NameNode and DataNode directories.
$ vim hdfs-site.xml<configuration>
<property>
<name>dfs.replication</name>
<value>1</value>
</property>
<property>
<name>dfs.name.dir</name>
<value>file:///home/hadoop/hadoopdata/hdfs/namenode</value>
</property>
<property>
<name>dfs.data.dir</name>
<value>file:///home/hadoop/hadoopdata/hdfs/datanode</value>
</property>
</configuration>Now, edit the mapred-site.xml file.
$ vim mapred-site.xml<configuration>
<property>
<name>mapreduce.framework.name</name>
<value>yarn</value>
</property>
<property>
<name>yarn.app.mapreduce.am.env</name>
<value>HADOOP_MAPRED_HOME=/home/hadoop/hadoop</value>
</property>
<property>
<name>mapreduce.map.env</name>
<value>HADOOP_MAPRED_HOME=/home/hadoop/hadoop</value>
</property>
<property>
<name>mapreduce.reduce.env</name>
<value>HADOOP_MAPRED_HOME=/home/hadoop/hadoop</value>
</property>
</configuration>Finally, edit the yarn-site.xml file.
$ vim yarn-site.xml<configuration>
<property>
<name>yarn.nodemanager.aux-services</name>
<value>mapreduce_shuffle</value>
</property>
</configuration>With the configuration files updated, format the NameNode.
$ hdfs namenode -formatThe output will look similar to this:
$ hdfs namenode -format
WARNING: /home/hadoop/hadoop/logs does not exist. Creating.
2025-11-04 20:17:33,884 INFO namenode.NameNode: STARTUP_MSG:
/************************************************************
STARTUP_MSG: Starting NameNode
STARTUP_MSG:   host = HXCN-Rokey8-Hpv/172.23.36.186
STARTUP_MSG:   args = [-format]
STARTUP_MSG:   version = 3.4.2
......
2025-11-04 20:17:34,415 INFO namenode.FSImage: Allocated new BlockPoolId: BP-304305349-172.23.36.186-1762258654410 # A unique ID has been generated for your HDFS cluster.
2025-11-04 20:17:34,439 INFO common.Storage: Storage directory /home/hadoop/hadoopdata/hdfs/namenode has been successfully formatted. # The dfs.name.dir directory from hdfs-site.xml has been formatted as the metadata storage for HDFS.
......
2025-11-04 20:17:34,510 INFO namenode.FSImageFormatProtobuf: Image file /home/hadoop/hadoopdata/hdfs/namenode/current/fsimage.ckpt_0000000000000000000 of size 401 bytes saved in 0 seconds . # The initial metadata image file 'fsimage' has been successfully created and saved.
......
2025-11-04 20:17:34,533 INFO namenode.NameNode: SHUTDOWN_MSG:
/************************************************************
SHUTDOWN_MSG: Shutting down NameNode at HXCN-Rokey8-Hpv/172.23.36.186
************************************************************/ # Normal shutdown message.
The format command is a one-time operation that automatically exits upon successful completion. The log confirms a normal process exit.
During the installation on Rocky Linux 8, you may encounter the following warning:
2025-11-04 20:17:34,033 WARN util.NativeCodeLoader: Unable to load native-hadoop library for your platform... using builtin-java classes where applicableThis is a common warning that can be safely ignored for now. It indicates that Hadoop could not find optimized native libraries for your specific operating system and will use the pure Java implementation as a fallback. While this would be addressed in a production environment to maximize performance, it has no functional impact on a single-node test setup.
4. Configure the Firewall
Run the following commands to allow Apache Hadoop connections through the firewall. These commands must be executed as the root user or an account with sudo privileges.
$ firewall-cmd --permanent --add-port=9870/tcp
$ firewall-cmd --permanent --add-port=8088/tcp
$ firewall-cmd --reload
Starting Hadoop and YARN
Startup Scripts
Because the ~/.bashrc file was configured with the necessary environment variables, you can directly run the following command to start the NameNode and DataNode daemons:
$ start-dfs.shThe start-dfs.sh script is located in the $HADOOP_HOME/sbin directory, which is dedicated to scripts for managing Hadoop services. Having this directory in the system's PATH means you can execute the command from any location without navigating to the sbin folder.
After executing the script, the output will be similar to this:
$ start-dfs.sh
Starting namenodes on [HXCN-Rokey8-Hpv]
HXCN-Rokey8-Hpv: Warning: Permanently added 'hxcn-rokey8-hpv,172.23.36.186' (ECDSA) to the list of known hosts.
Starting datanodes
Starting secondary namenodes [HXCN-Rokey8-Hpv]
2025-11-04 20:49:03,256 WARN util.NativeCodeLoader: Unable to load native-hadoop library for your platform... using builtin-java classes where applicable```
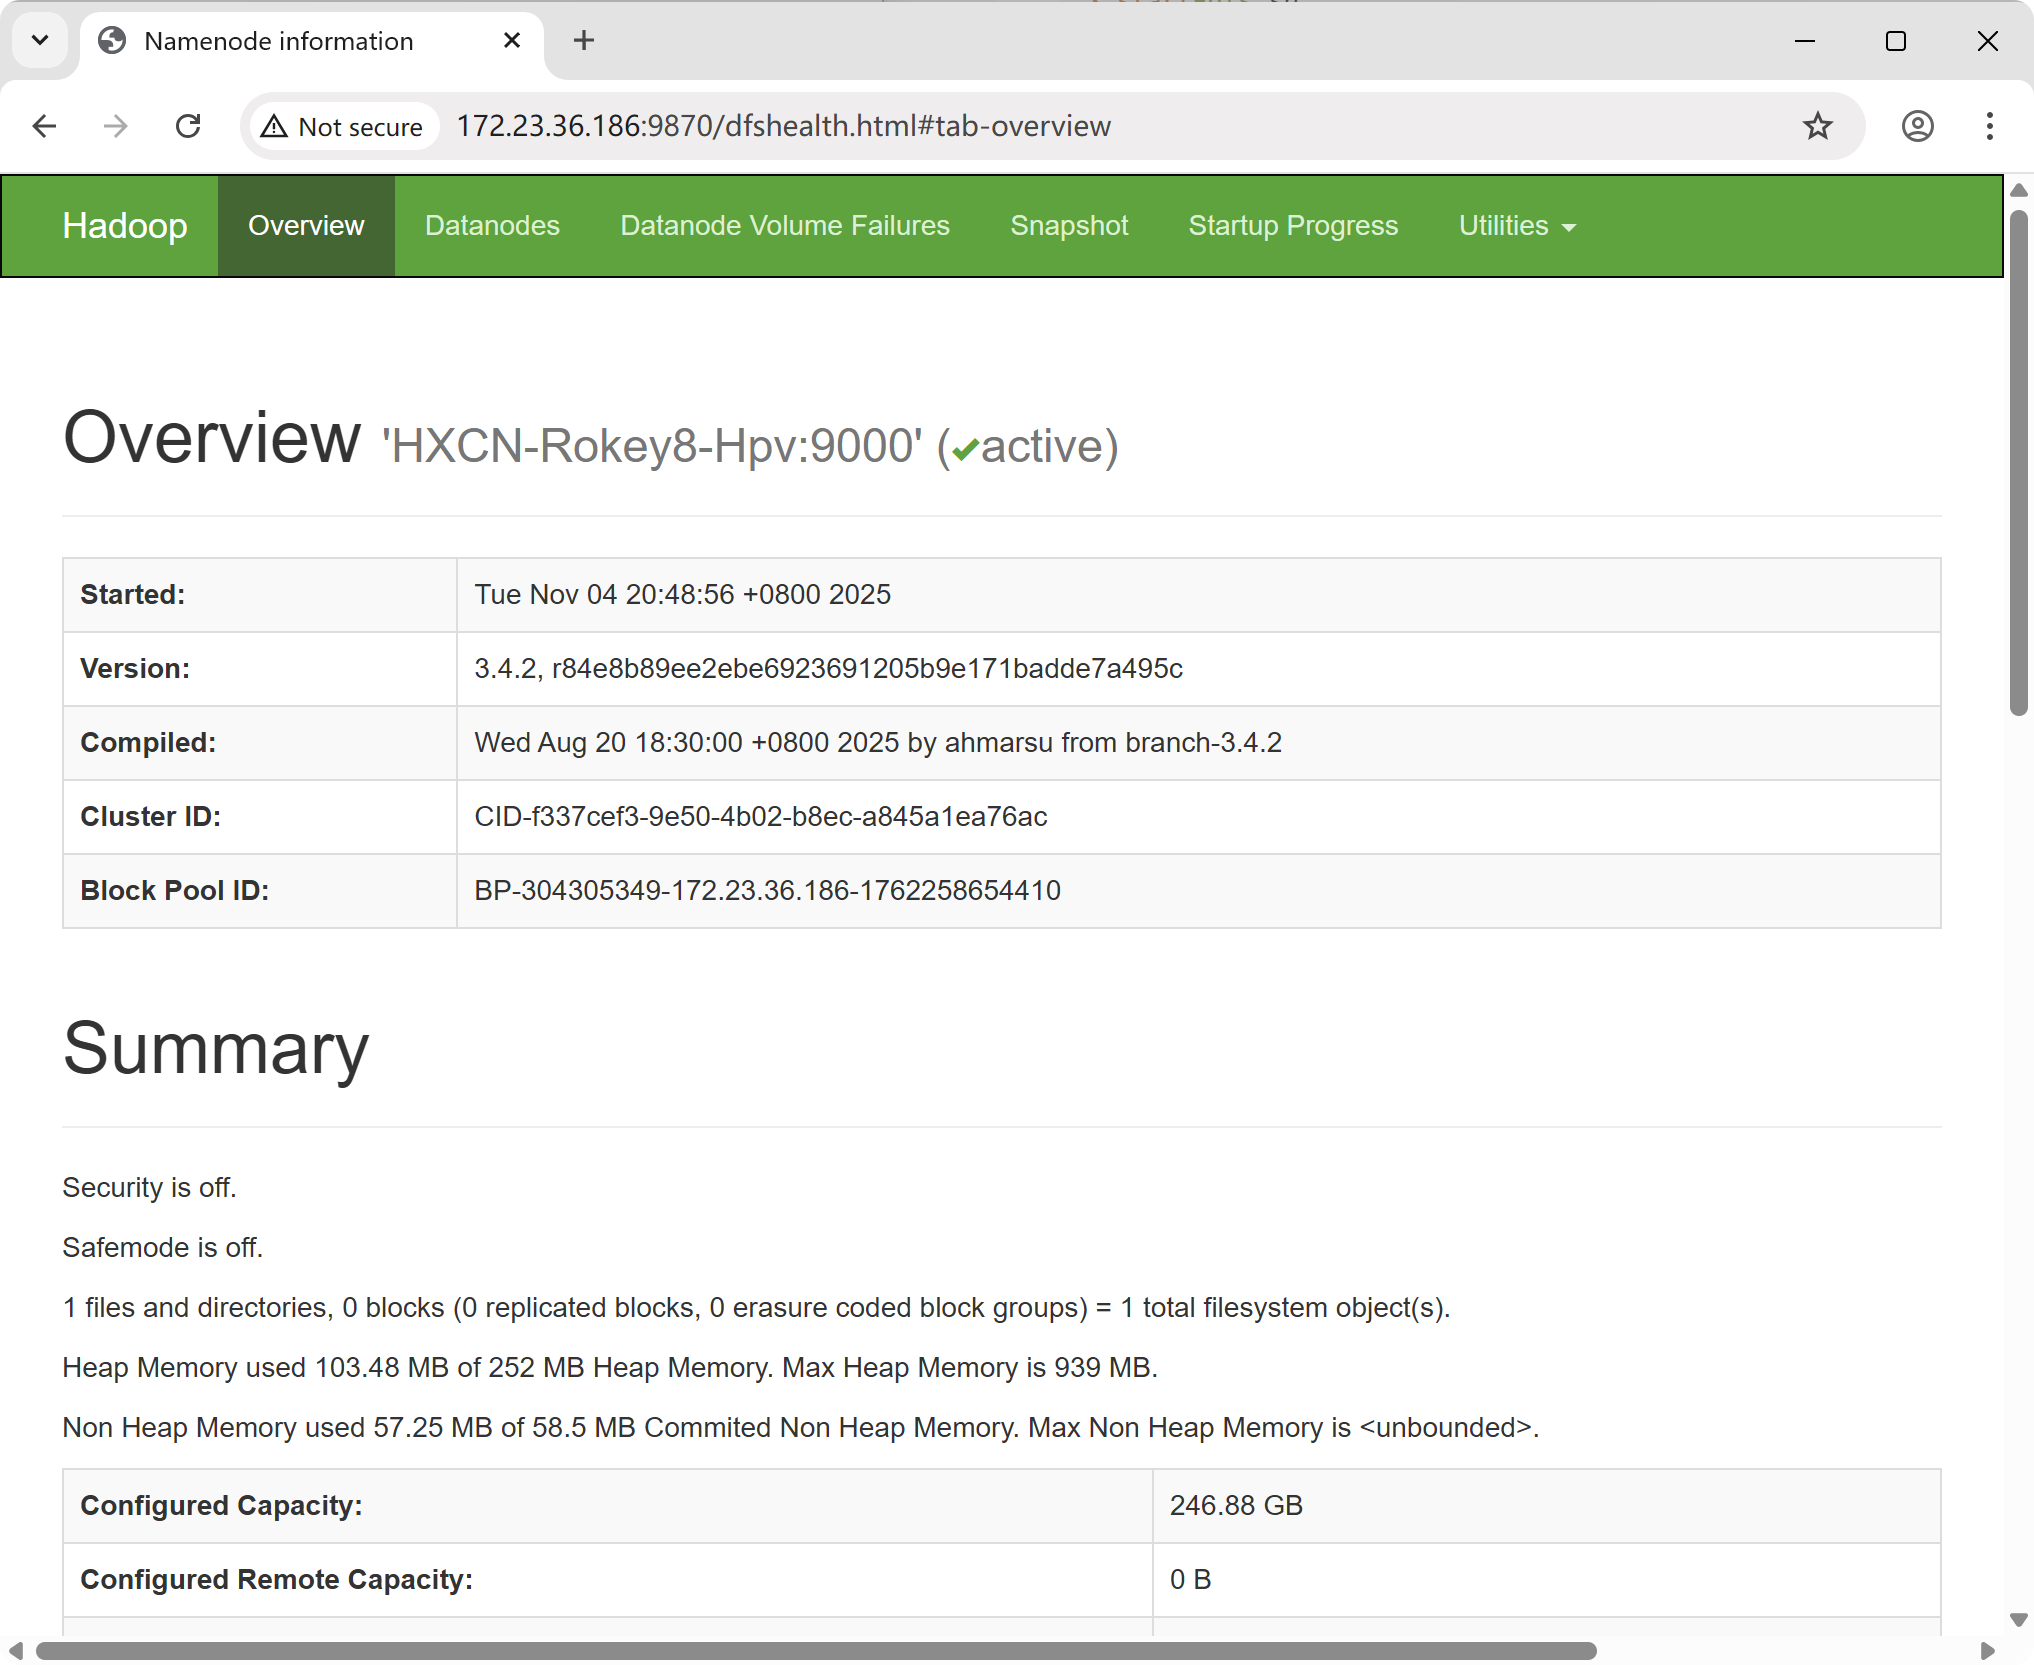
You can now access the Hadoop NameNode web interface by navigating to the following address in your browser:
http://<hadoop_ip>:9870/
Replace `<hadoop_ip>` with the IP address shown in the startup log.
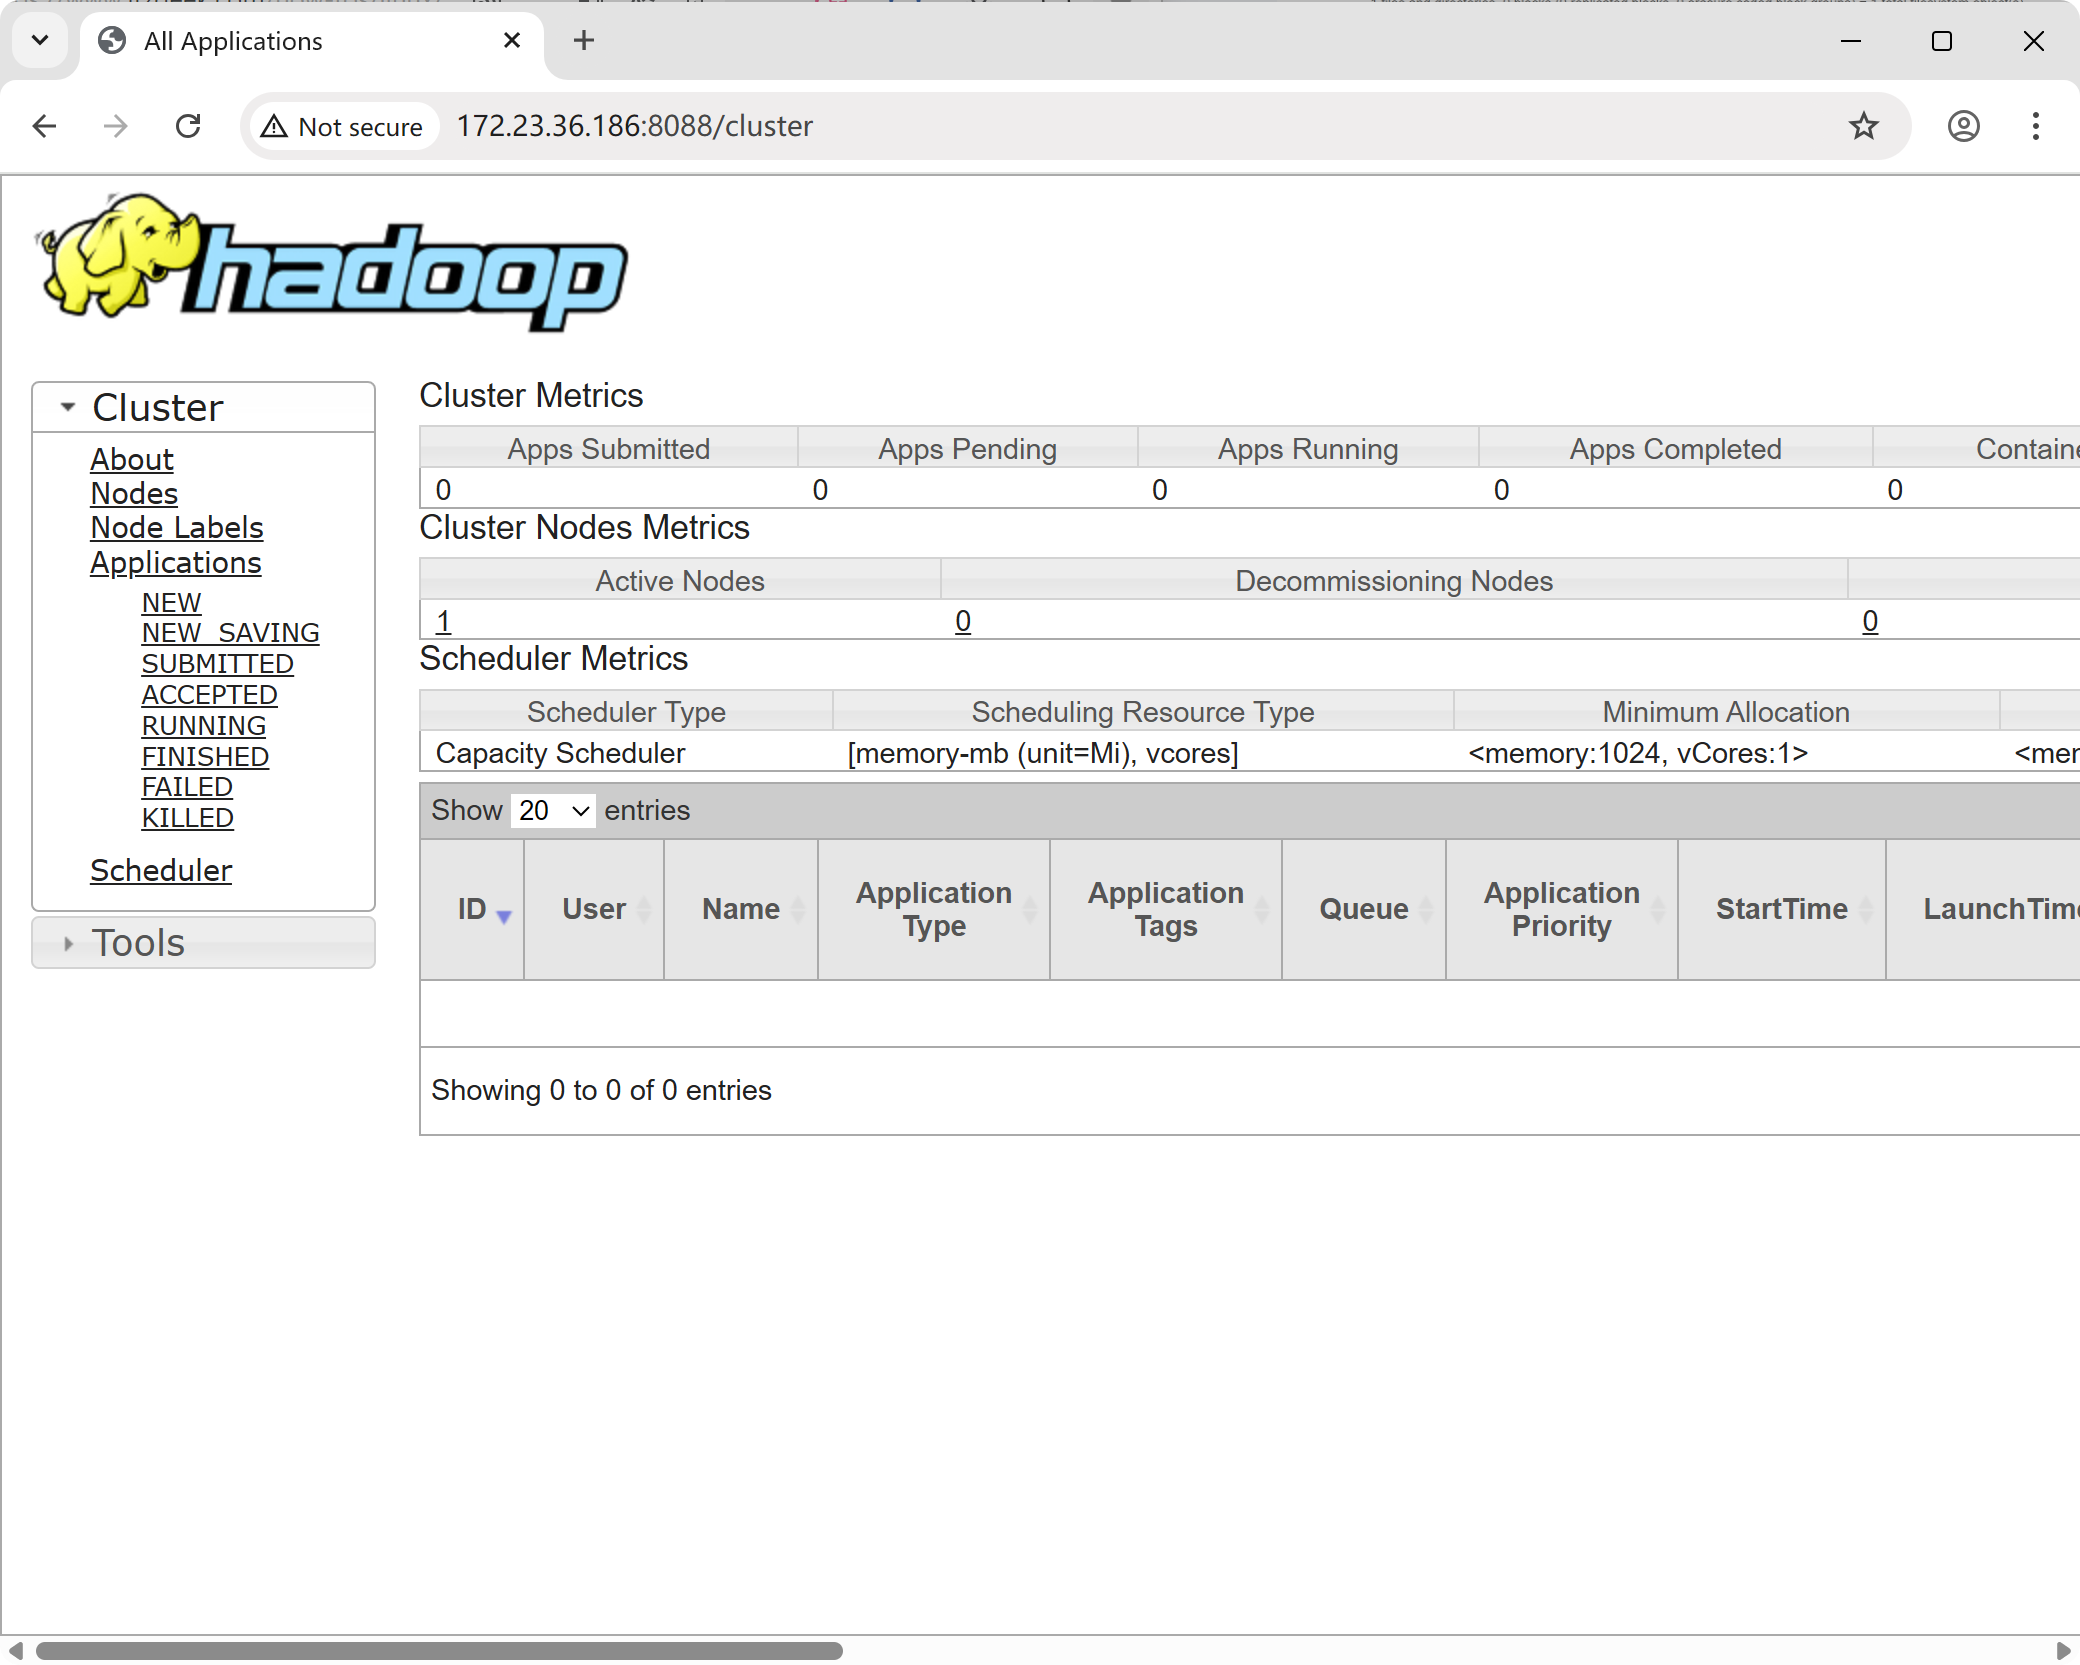
Next, use the following command to start the ResourceManager and NodeManager daemons:
```bash
$ start-yarn.sh```
The script will produce the following output:
```bash
Starting resourcemanager
Starting nodemanagersIn your browser, go to the following address to access the ResourceManager component's web interface:
http://<hadoop_ip>:8088/Again, replace <hadoop_ip> with your server's IP address.
To verify that the NameNode, DataNode, and SecondaryNameNode processes are running correctly, use the following command:
$ jps
5474 SecondaryNameNode
5939 ResourceManager
5254 DataNode
35798 Jps
6107 NodeManager
5068 NameNode
If you are running the jps command for the first time, you may need to switch to the root user and install the required package by running jps.
start-dfs.sh
This script is responsible for starting all services for HDFS (Hadoop Distributed File System), which include:
NameNode: The master node of HDFS, which manages the file system's metadata (e.g., filenames and storage locations).
DataNode(s): The slave nodes of HDFS, responsible for the actual storage of file data blocks.
SecondaryNameNode: Assists the NameNode by performing metadata checkpoint operations to prevent data loss.
start-yarn.sh
This script starts all services for YARN (Yet Another Resource Negotiator), which is Hadoop's resource management and job scheduling framework. The services include:
ResourceManager: The master node of YARN, responsible for managing and allocating resources across the entire cluster.
NodeManager(s): The slave nodes of YARN, which manage resources on individual nodes and execute tasks assigned by the ResourceManager.
start-all.sh
Alternatively, you can use the command below to start both scripts sequentially:
$ start-all.shHowever, in Hadoop 2.x and later versions, the start-all.sh and stop-all.sh scripts have been officially deprecated. Although they are still available for convenience, the recommended practice is to start HDFS and YARN separately. This approach provides clearer control and a better understanding of the cluster's state.
Testing Apache Hadoop
1. File Upload
Create a user directory in HDFS.
$ hdfs dfs -mkdir -p /user/hadoopCreate an input directory for data.
$ hdfs dfs -mkdir inputCopy the XML configuration files into the input directory.
$ hdfs dfs -put $HADOOP_HOME/etc/hadoop/*.xml inputYou can verify the uploaded files by running the following command:
$ hdfs dfs -ls inputIf you have run a Hadoop job previously, you may need to remove the output directory first:
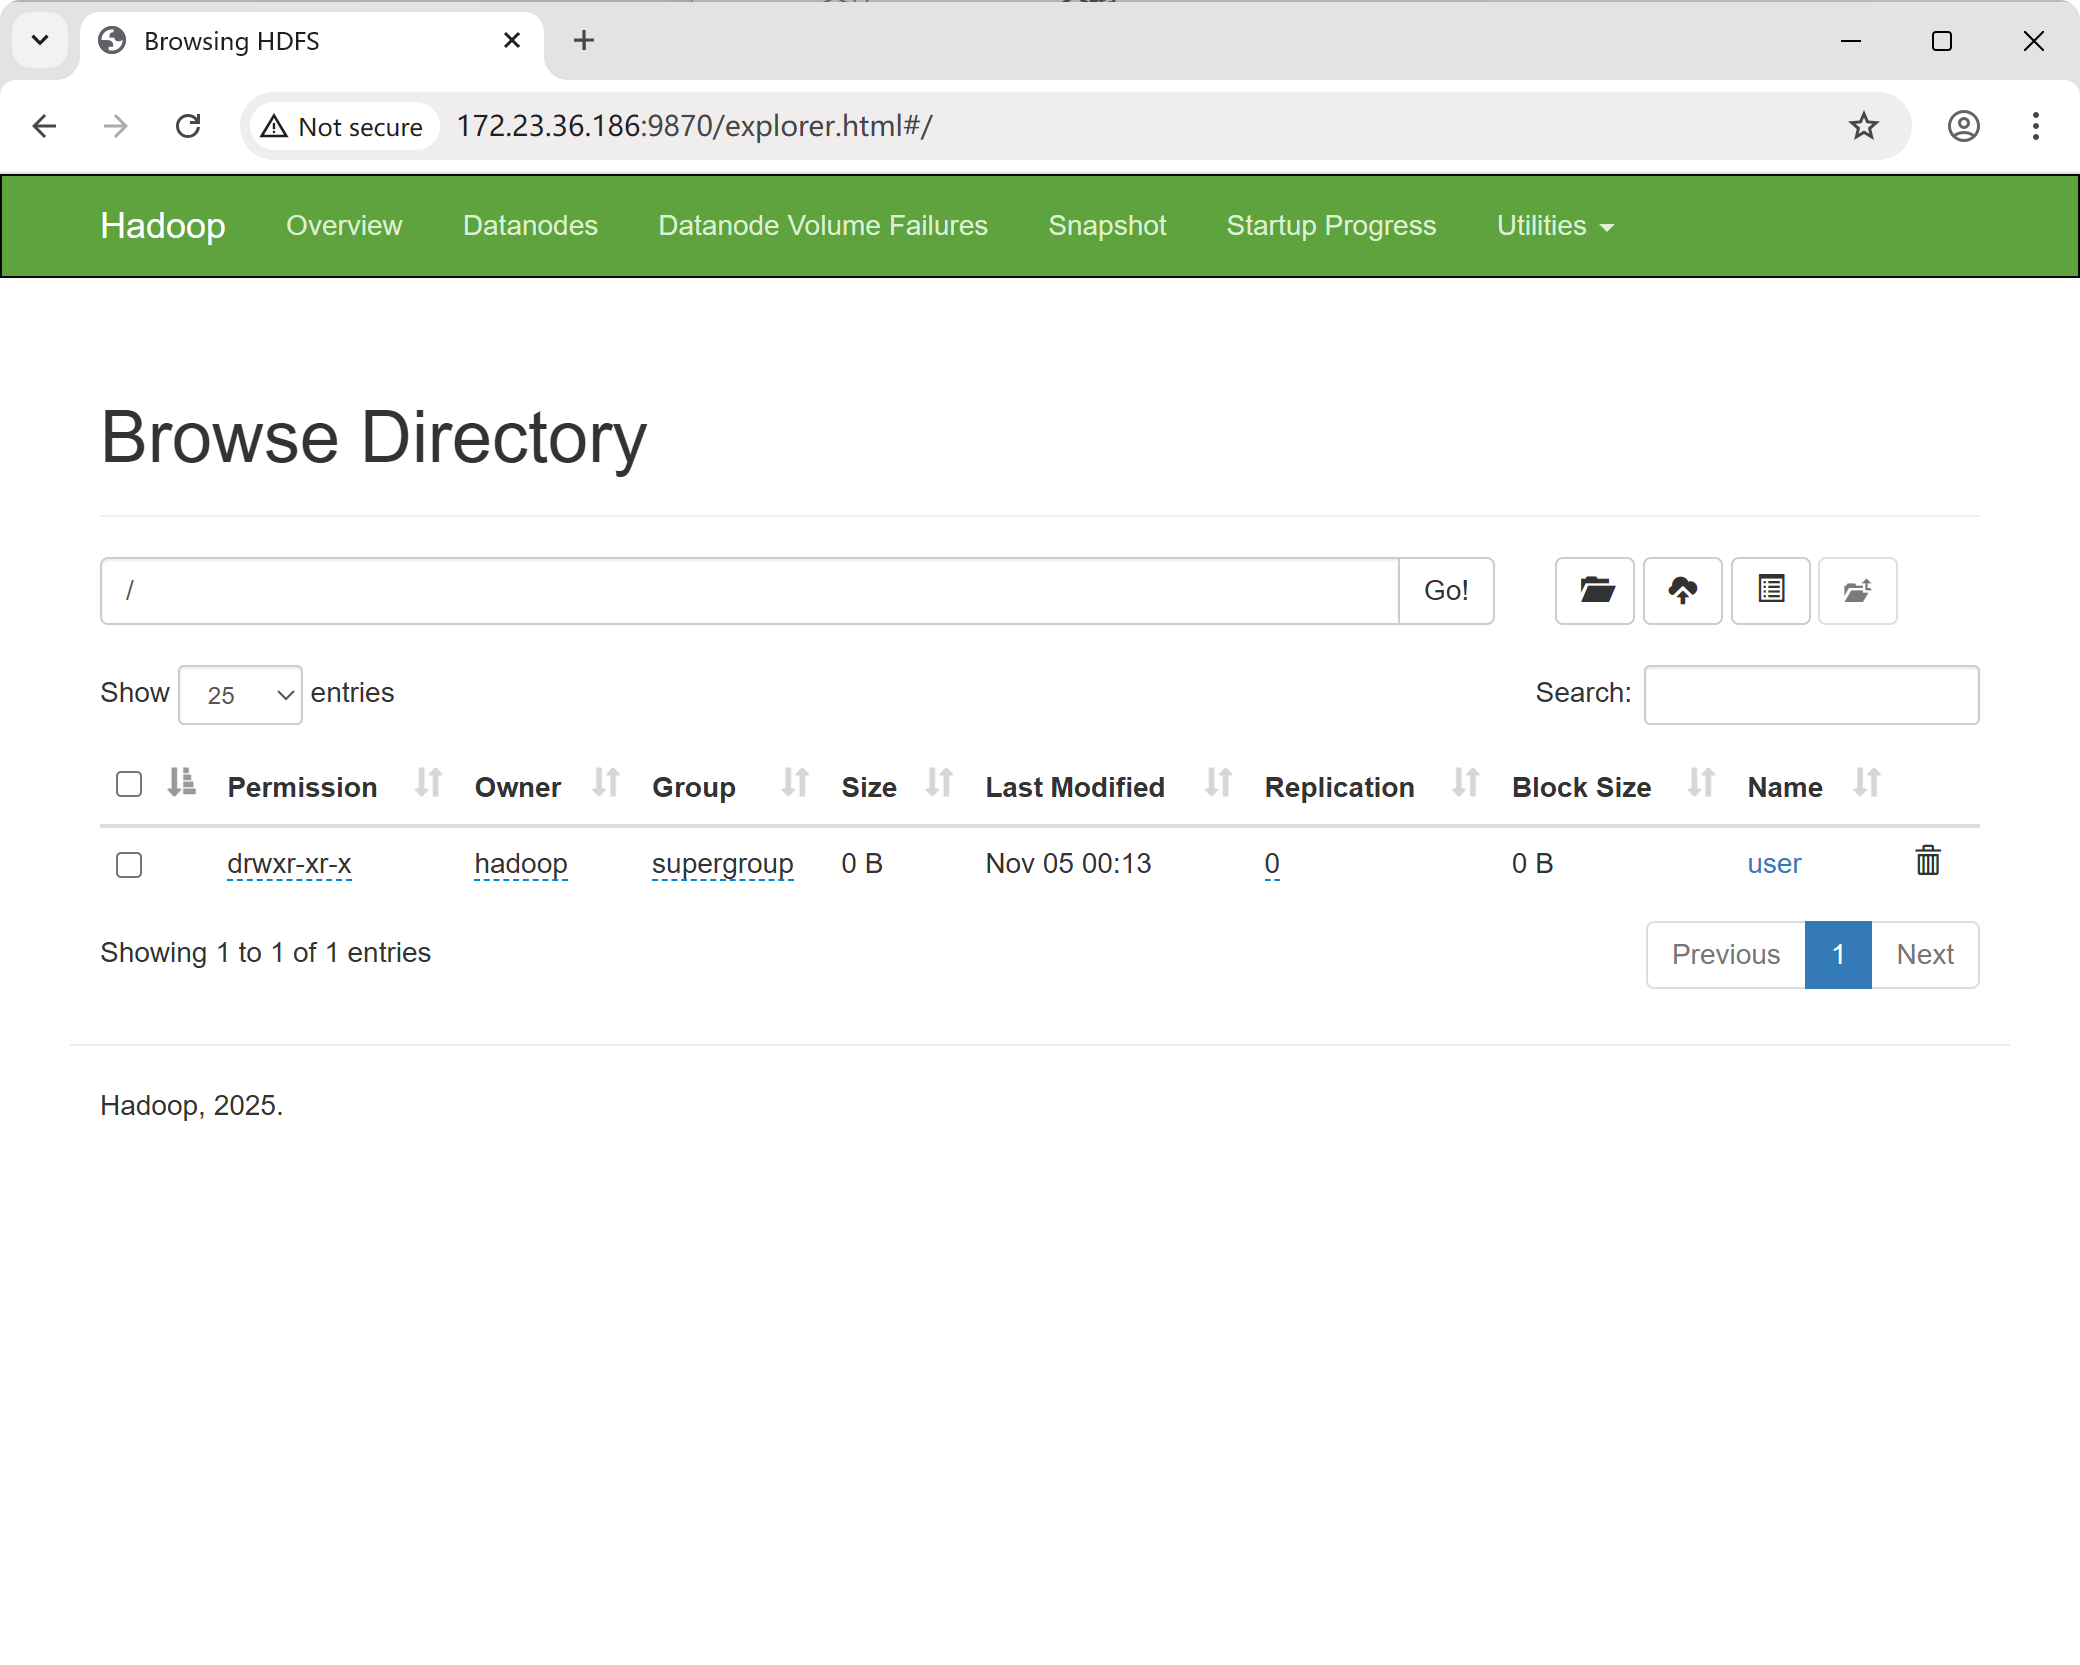
$ hdfs dfs -rmdir outputYou can also browse the HDFS file system through the NameNode web UI. Navigate to "Utilities" and click "Browse the file system."
2. Running an Example
First, change your current directory to the Hadoop installation folder.
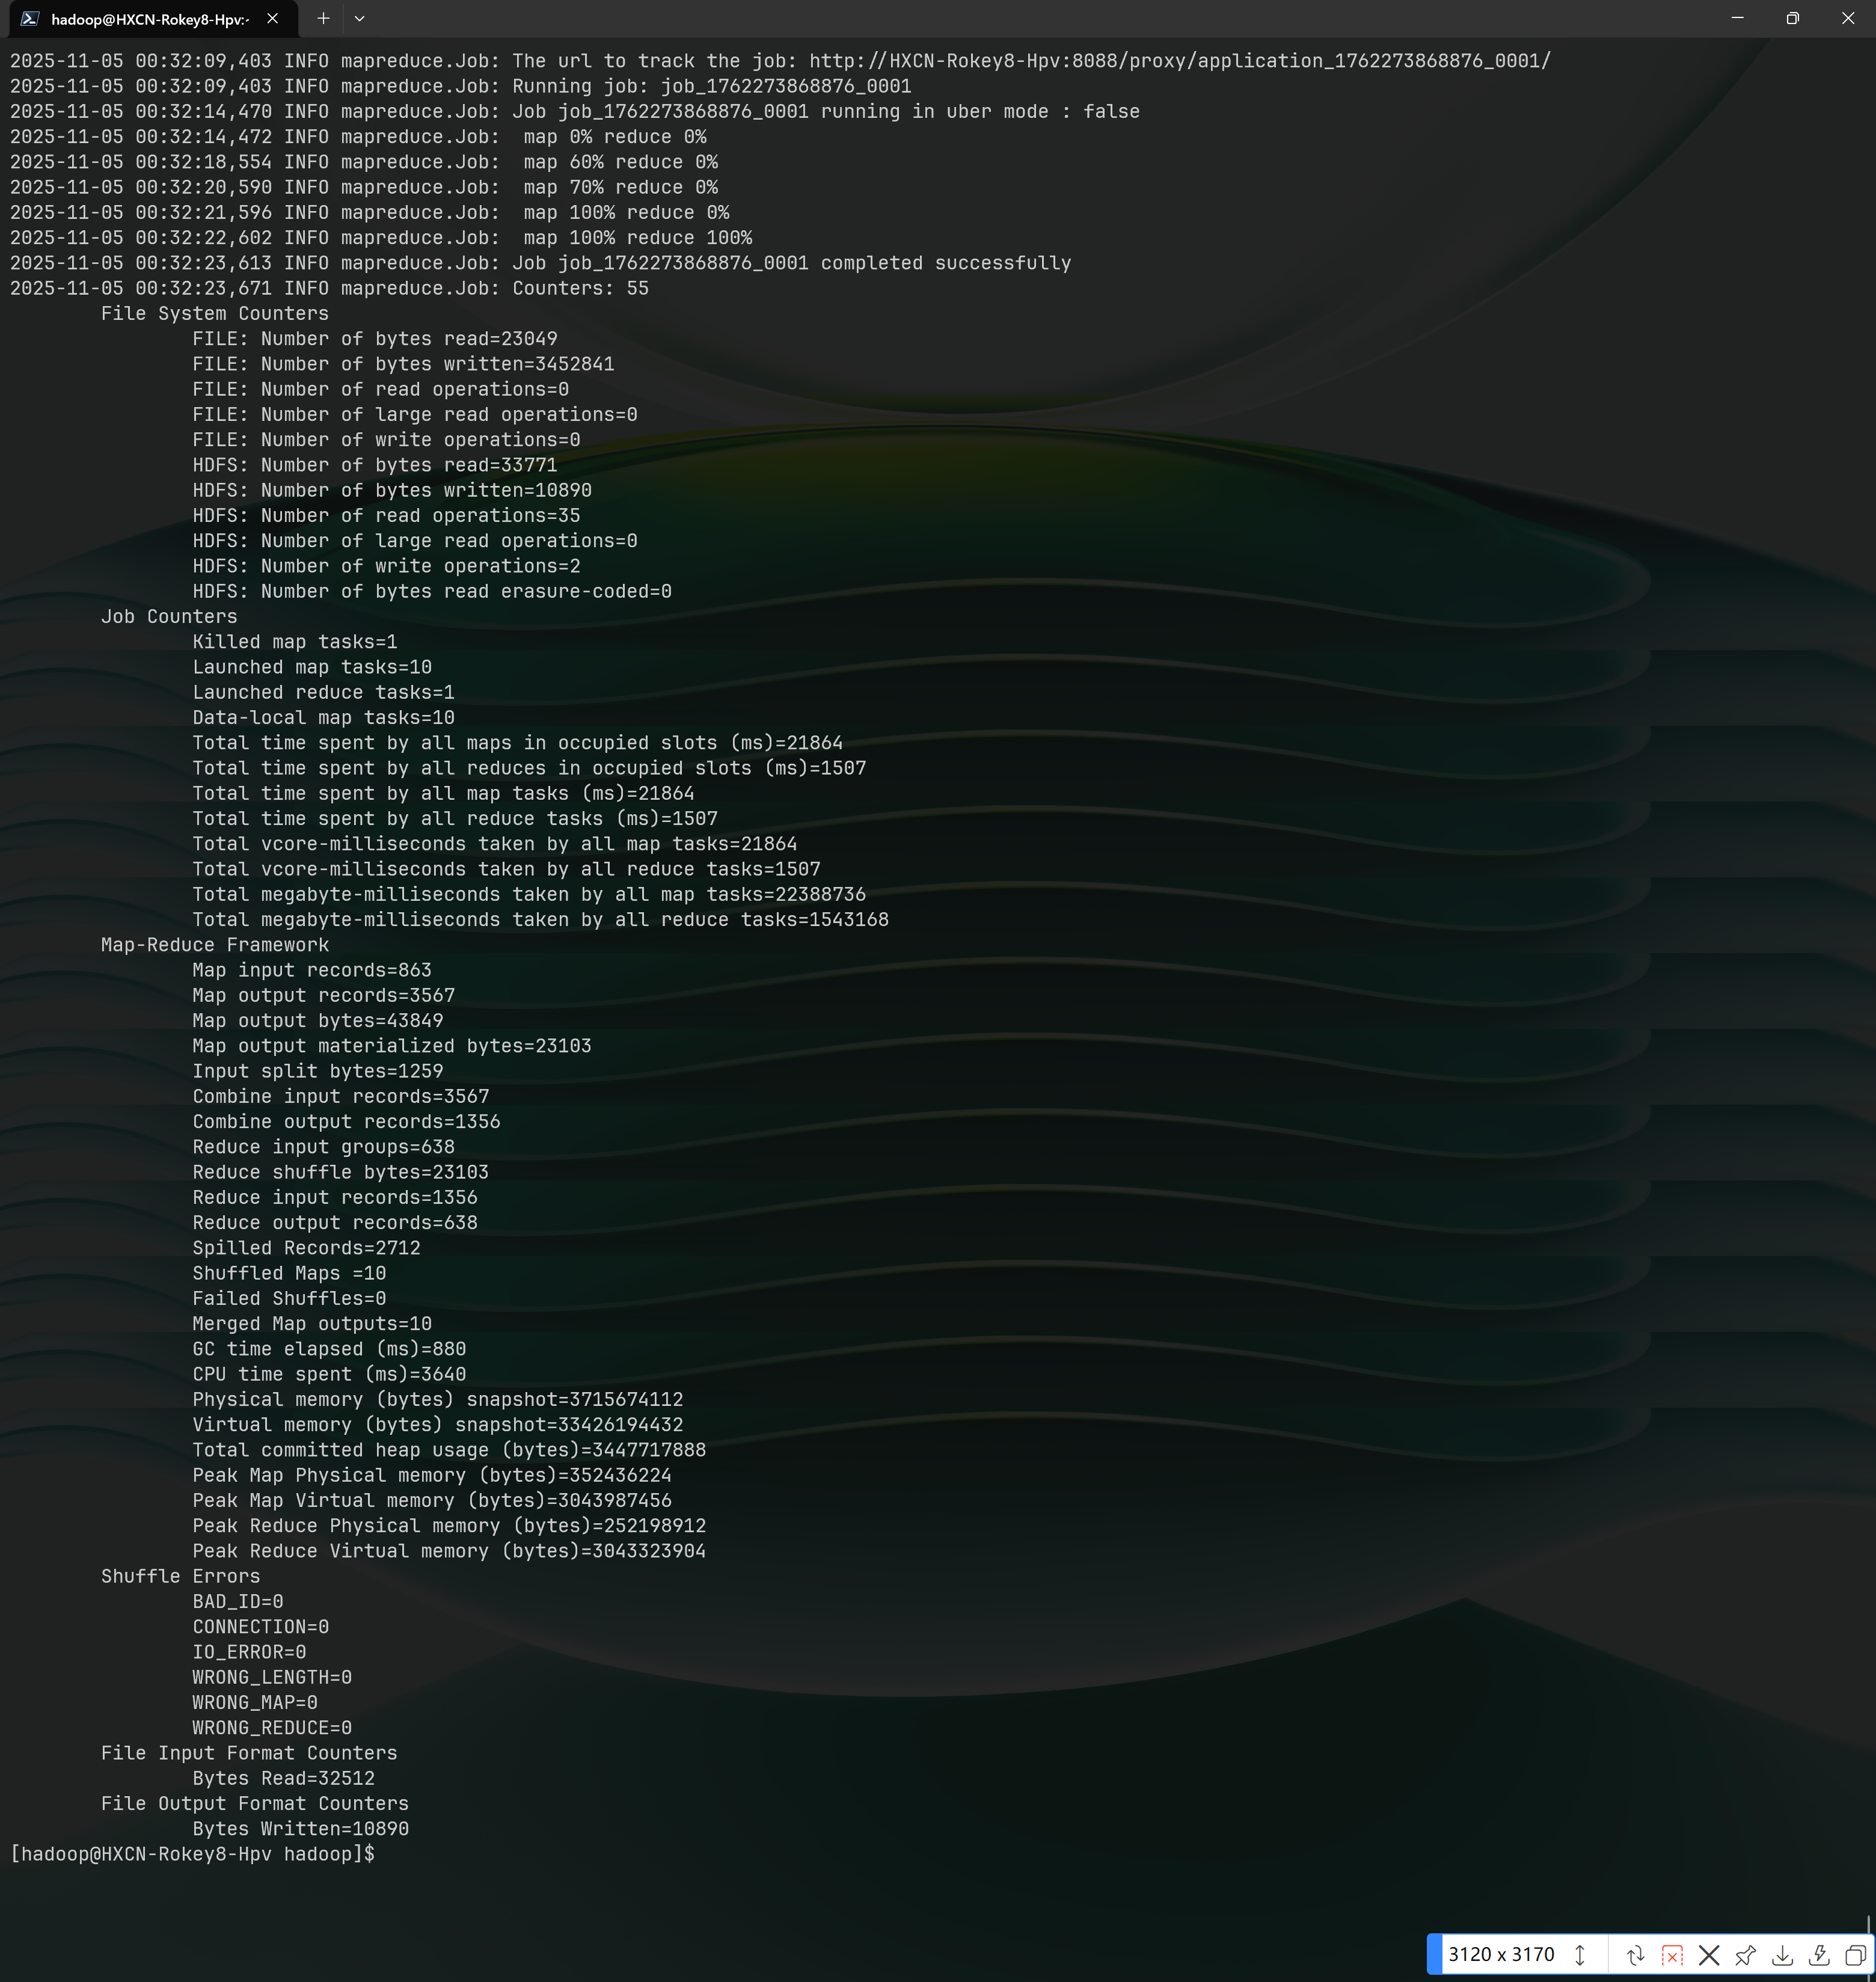
$ cd ~/hadoopExecute a MapReduce job using the wordcount example.
$ hadoop jar ./share/hadoop/mapreduce/hadoop-mapreduce-examples-*.jar wordcount /user/hadoop/input /user/hadoop/outputThe execution results will be displayed as follows:
Navigate into Hadoop's bin directory.
$ cd $HADOOP_HOME/binView the results of the job.
hdfs dfs -ls ./output
hdfs dfs -cat output/*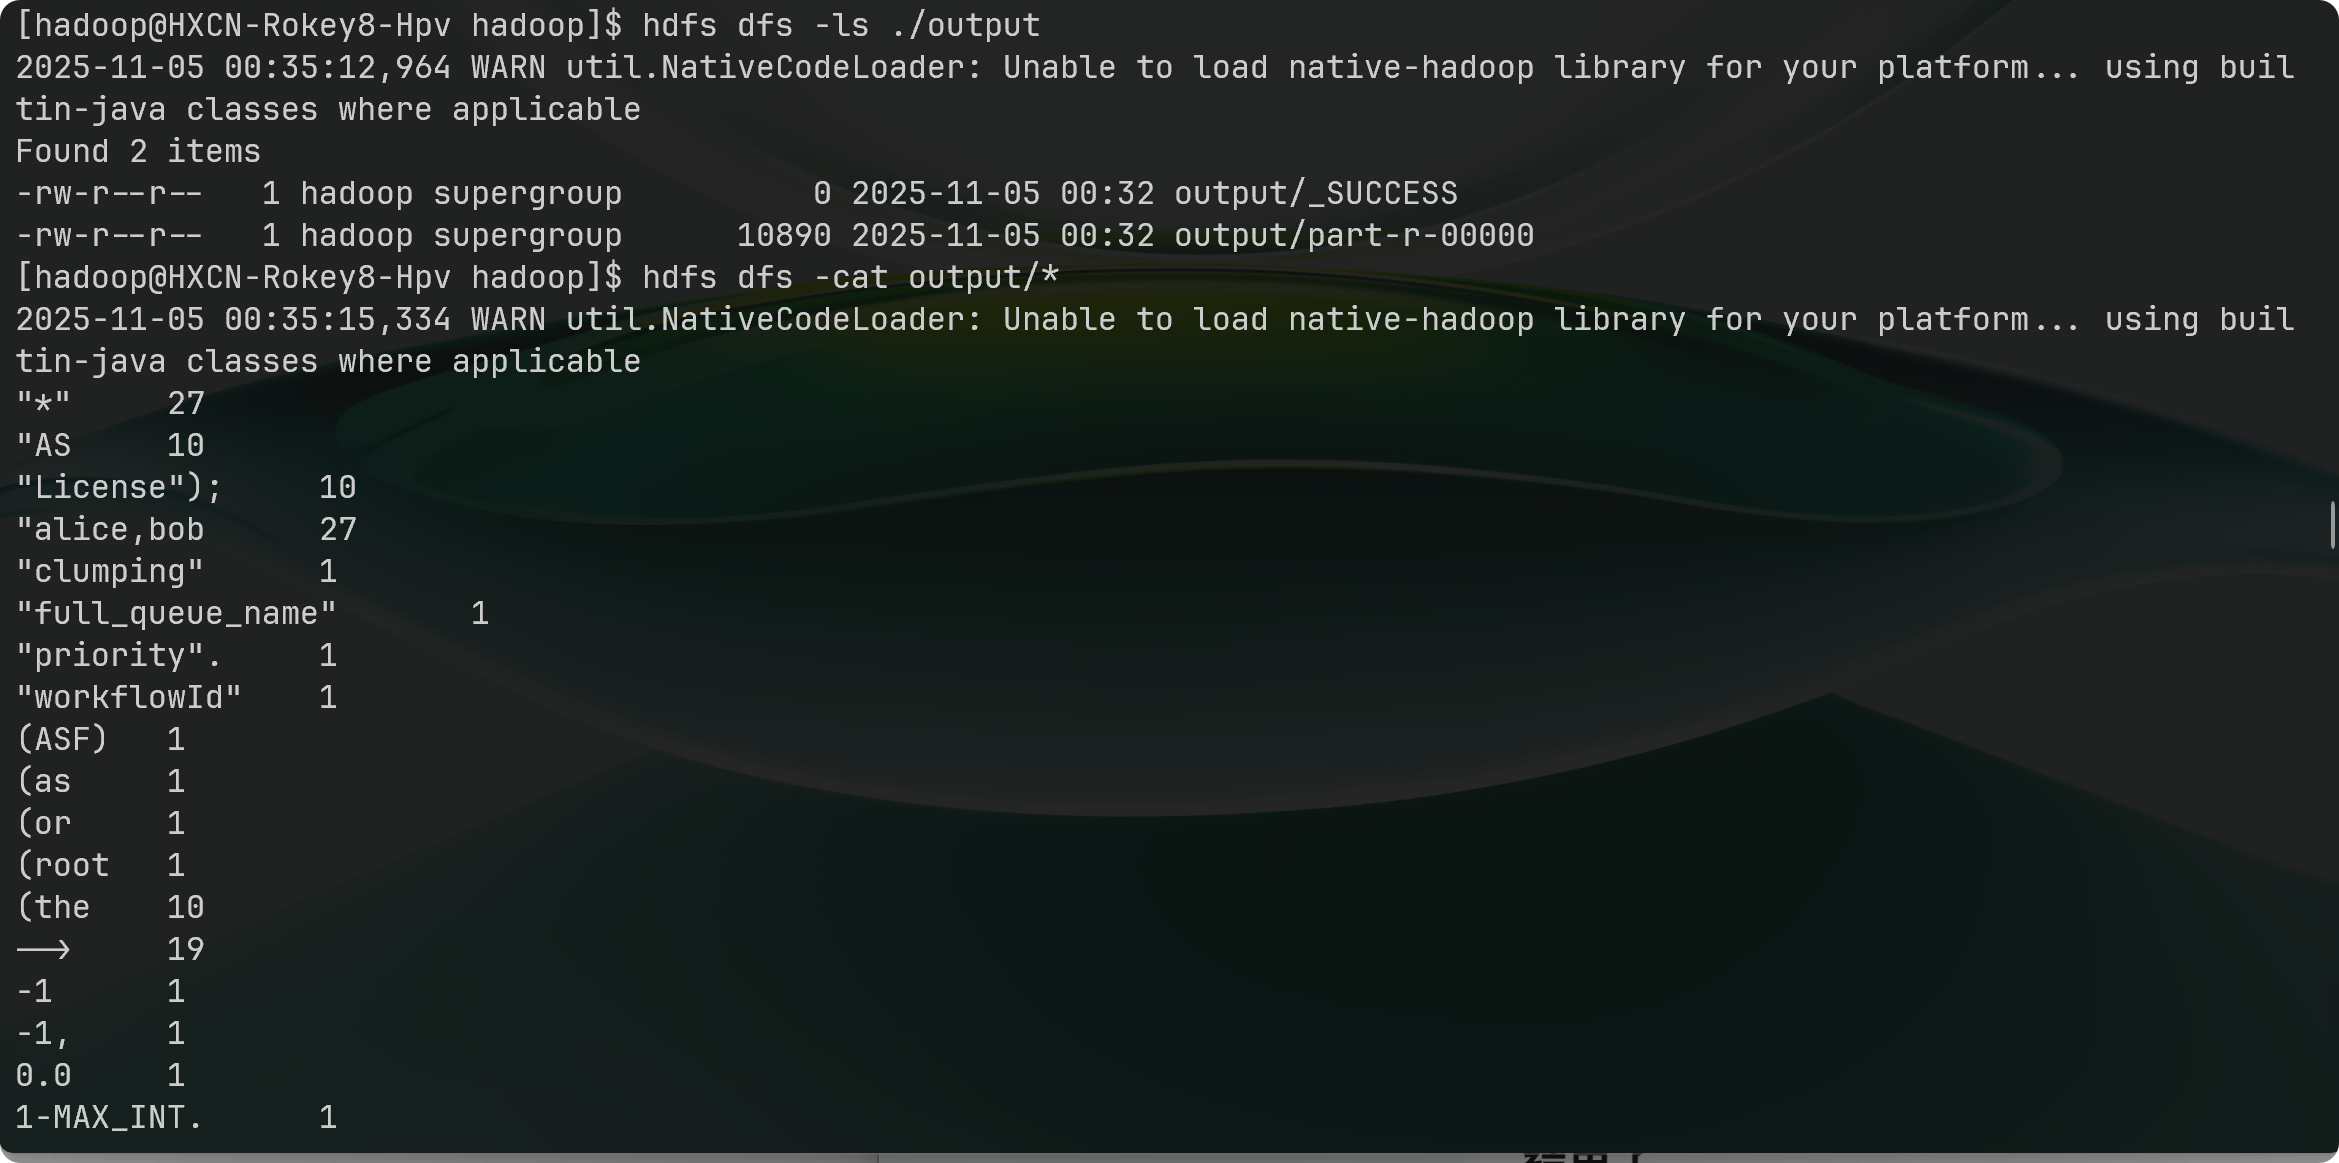
Conclusion
This guide has covered the entire process of configuring Hadoop on Rocky Linux 8. For more in-depth information, you can consult the Official Apache Hadoop Documentation.